With the release of Dynamics 365 Customer Engagement 9.0 (July 2017 Update) the old downloadable SDK has been replaced by online documentation and NuGet packages. This means that we can pull the latest SDK assemblies directly from Nuget. Typically you would want the package Microsoft.CrmSdk.CoreAssemblies. You typically download the SDK assemblies directly from the NuGet Package Manager within Visual Studio and then the tools like PluginRegistration via Powershell.
SDK Old World vs. New World
Initially it may feel a little frustrating because instead of having the SDK help file, code samples, plugin registration tool and the rest in one ZIP file you will now have to familiarize yourself with the new online locations and of course will need an Online connection to browse for help. This is assuming you are working on v9+ either online or on premise. If working on an older implementation of course we still have the original SDK’s targeted at those specific versions.
Not going to list them all but essentially you will typically grab these from within Visual Studio directly through Nuget Package Manager. If you wish to automate updates and pull these as part of your build process you will need to develop your own powershell script to do it. The SDK assemblies are listed here with release notes.
As with any NuGet approach there is always the challenge of ensuring that developers are all using the same and latest versions. The update process is typically manual. The way around this is to automate via powershell to pull the latest packages as part of your DevOps Build pipeline.
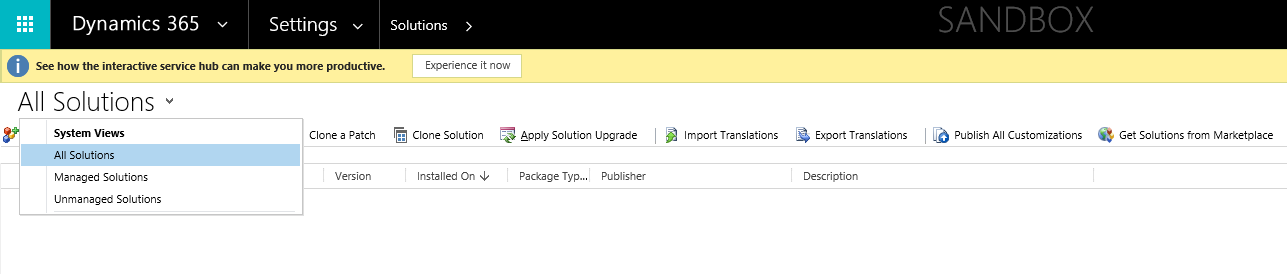
There are two types of solution in Microsoft Dynamics 365.
Managed and unmanaged.
Which one should be used in any given situation is up for debate (no it really is). On one hand you have Microsoft saying that unmanaged should be exported as Managed when targeting any instance which is not the development environment typically meaning UAT and Production.
This is part of the ALM guidance which is only 76+ pages so enjoy the read. I’m going to try and keep this article snappy to give you the main considerations and background to the whole managed vs unmanaged debate based on my practical experience of using both approach in CRM implementations.
Understanding Solution Levels
Any dynamics 365 instance has the following layers or levels:
System Layer
Unmanaged Layer
Managed Layer
System layer is known as the “default solution” it contains all out of the box customisations, so is the vanilla instance if you will of a CRM instance once provisioned. Now, when we create unmanaged solutions, we are creating a container or view into the default solution, the solution itself (or the reference) is stored in the unmanaged layer but understand, as they are unmanaged solutions, we are effectively modifying the default solution. This means that an unmanaged solution cannot be uninstalled. I think of unmanaged solutions as “a view” into the system or if you like the source code of the solution and a managed solution is the assembly. If you delete a unmanaged solution, it will only delete the reference entry in the unmanaged layer, the customisation remain in the default solution.
A managed solution on the other hand is non-editable though some managed properties can be set, they (and their specific customisations) can also be uninstalled (mostly) from the system. Managed solutions can be layered (stacked) on top of each other so in a sense provide version control. How effective is that version control? Why would we want cross solution dependencies (layered functionality)? How easy is it to update a managed solution in a target instance especially if the customer breaks or changes something directly in those environments? All are separate considerations when looking at the listed pros and cons of each approach.
The Cumulative Nature Of Solutions
As the header states, whether managed or unmanaged, they effectively make additions to the platform as we are customising the system either at the system layer or managed layer. For this reason, if something new is added to the system it can never be completely removed (there are fragments of it left in the metadata) but what is true is that if you delete a component/attribute/relationship in an unmanaged solution it will be removed from the platform vs. not having that option if you deployed as a managed solution. Did you get that if not read the last line again… you can not delete anything when you deployed as managed. That should signal alarm bells if you are NOT an ISV and are for example working in an Agile environment on a Dynamics 365 implementation.
Managed Solutions Overview
Managed solutions are “cumulative” even if you overwrite a managed solution with a newer version it will not remove the old components or change that metadata. The only way to remove components is to uninstall the managed solution completely however that will also drop any reference or user data that you may have previously imported (I’ll touch on the holding workaround and Dynamics 2016 new features later on). A managed solution funnily enough means everything is well err managed so that means components such as:
Entities
Javascript
Views
Attributes
Relationships
Forms
Option Sets
Will not be removed, even when they are not included in an updated managed solution version. Also you can not go in there and manually delete managed components directly so all of those old relationships, attributes and the rest will sit in the system bloating it over time. Managed solutions can also be a nightmare when you are looking to update them with a new version especially if you have removed things like relationships from dev and then try to import conflicting changes.
Which One Should Be Used
There are a few key things to consider. Managed solutions really were created so that Microsoft Partners/Independent Software Vendor (ISV) had a means to protect their IPR, package up and sell solutions to the market along with the means to issue updated versions in a controlled way. The official line is that a mature customer would want a robust and version controlled release cycle and so managed solutions (in theory) provide this capability as they are layered and you can’t edit them or remove directly in the target environments (without completely uninstalling).
Scratch that for a second, take note “Ever noticed in life there is often a big difference between what one should do as deemed to be best practice vs. reality of what actually happens?”.
I’m going to summarise when one is preferred over the other… here goes:
Use Managed solutions if you are a ISV and plan to release to the market place.
Use Unmanaged solutions where you are working on an ever-changing platform meaning customisations are happening all the time so it is not a fixed deployment.
If you can’t trust the development team to update solution versions before export, check-out and check-in code into TFS or whatever code repository you have in place and follow a good release practice then I would argue that’s a fundamental issue outside of whether to use managed or unmanaged solutions. Restricting a deployment and adding technical complexity is not the answer.
To me, it seems to come down to a couple of things namely “trust” and “paranoia”. You need to trust that developers are not silly enough to go and customise the system in UAT/Production thereby causing issues the next time one tries to import a solution. You also would ensure that the customer has the security roles appropriate to their level of knowledge.
If you have a team of developers all working on CRM, chances are you may not even have a “core solution” because that would be huge and take ages every time you wanted to deploy or customise the application ribbon. Once the core CRM has been customised and released to Production, chances are there will be multiple maintenance type sprints a decision would be needed on whether to have the one main solution or to have multiple unmanaged solutions representing the sprint and user story (separate article on that one!) which you would deploy individually to UAT and then Production in the right order.
Add to this mixture, the problem of then having to work with Managed solutions across UAT and Production environments.
In a nutshell, using managed solutions adds more complexity to the development and release process for very little gain (unless you are a ISV).
Now in Dynamics 2016, to be fair Microsoft has added functionality so you can be very specific on what customisations should be included in a solution, along with patching, cloning and a stage for upgrade option, so this helps with reducing potential conflicts and dependencies that would otherwise cause a solution import to fail. Wonderful… but guess what, that is still adding more complexity to the release process. Holding solutions can also be used to help with data retention when looking to drop old components or fix any conflicting issues.
In my experience, there doesn’t appear to be a “right” or “wrong” answer to the question. I personally always go with the Microsoft/best practice recommendations but quite honestly, I have only ever seen managed solutions make implementations more complex for both the customer and development team for “zero” benefit. If there is good communication in the team, appropriate security models setup for the customer and fit for purpose release and development processes one can avoid the pain of managed solutions by addressing the real issues and project challenges head on.
If you haven’t already would recommend reading an earlier article which spawned me to write this one concerning the SDK differences across CRM Dynamics 2011, 2013, 2015, 2016 and Dynamics 365. If you read that article you would be thinking how the feck I am suppose to write my code to extend CRM with so many different connection options? The issue is that if you get this fundamentally wrong it can lead to abortive code later down the road and a need to potentially re-write your CRM wrapper assemblies.
This article is going to start with the latest version of Dynamics 365 and then work backwards from here so you can see the evolution.
Dynamics 365 and 2016
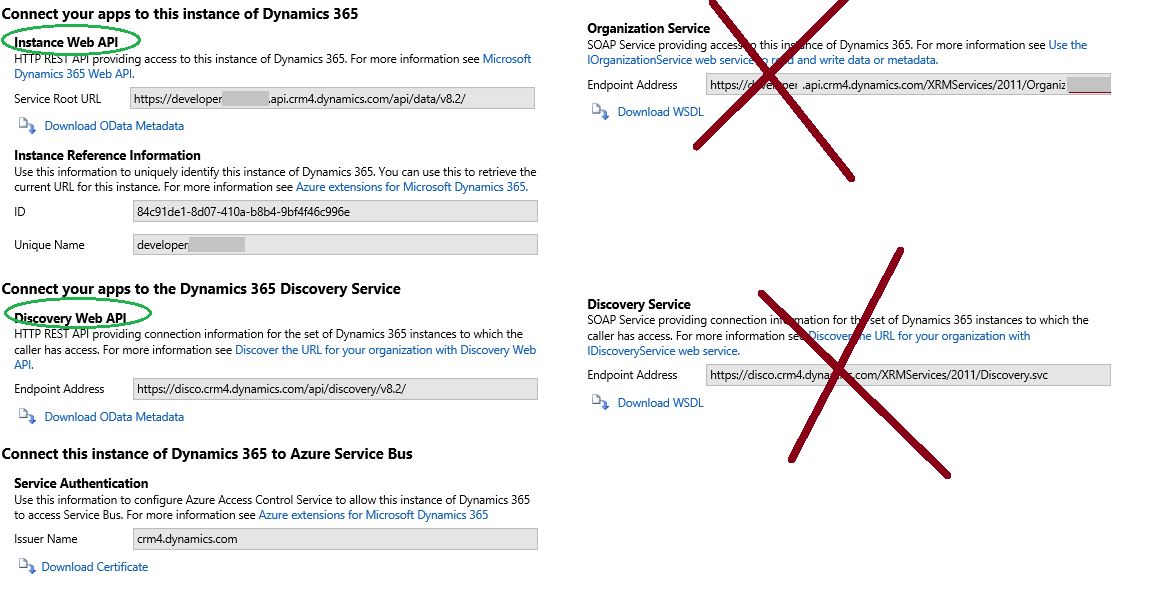
The End of the CRM SOAP Web Services (nearly… see red crosses!)
You should take note that the 2011 SOAP end point used by the Organisation/Discovery web services are officially deprecated as of CRM 2016; Microsoft are currently in the process of rewriting the SDK assemblies to use Web API instead from Dynamics 365 onwards. This means that the new Web API will be completely replace the Organization/Discovery SOAP based web services. Here is a good article on MSDN about the status of web services.
The current SDK assemblies can still be used for Plugins and Custom Workflow activities which is the recommended approach for Dynamics 365 rather than trying to use Web API within Plugins/CWA. Plus for a time, they can be used for custom applications. Once Microsoft have refactored the SDK assemblies to use Web API you would still continue to use those SDK for Plugin/CWA and then its up to you concerning client applications.
For client applications and indeed the web resources it is recommended that all future application code now uses the Web API (OData 4) which offers all of the capabilities we are use to working with using the OrganizationService SOAP end point. Microsoft have confirmed that in the very near future the SOAP end point will be completely replaced by Web API.
The Web API (OData 4) can be used in both JS and server-side code (e.g. C#) in fact it’s platform independent meaning its easier than ever to integrate with Dynamics 365 from lots of different devices and coding platforms. The other supported way is to connect your custom application to Dynamics 365 by using the SDK Tooling Connector API.
For web resources the OData end point was prevalent in earlier CRM releases but was limited (for example you could do the basic CRUD operations but not execute server messages or FetchXML queries for that you had to create SOAP envelopes and use the organization SOAP end point).
The new Web API can handle the CRUD operations same as before in addition to FetchXML / oData queries as part of the RetrieveMultiple call. Below are the methods now available using the Web API:
Create
Update
Delete
Retrieve
Retrieve multiple (using odata query and fetch)
Execute Web API functions (useful functions which dont change data)
Execute Web API Actions (parity with the SOAP Execute method to call standard and custom messages for example ExecuteWorkflow)
Execute Web API Query Functions (Query Options Basically)
Just in case its not yet clear!! The OData (Organisation Data Service) and the SOAP Web Services (Organization and Discovery) are both officially deprecated as of CRM 2016. Although Microsoft will continue to provide extended support for both the Organisation Data Service (OData) the SOAP end points for a period of time as things are progressively rolled out and those customers who need to upgrade CRM have time to refactor there libraries to use Web API.
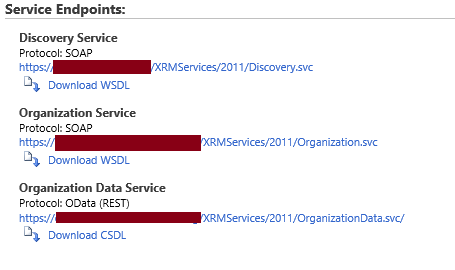
Dynamics CRM 2015, 2013, 2011
The red blocks are where you would normally see the server name (if on premise) where you are likely to have one or more organisation deployments. For Online its the instance name you have assigned to it via the CRM Admin Centre.
Starting from CRM 2013 onwards the SDK was updated with several assemblies all part of the new XRM Tooling API library:
The intention was that developers would move away from the Microsoft.Xrm.Client.dll assembly (discussed in detail later) and take advantage of the more comprehensive tooling API’s. I can tell you now that for many of my clients who already had an existing CRM Implementation (even upto 2016) most were still using the old Microsoft.Xrm.Client.dll assembly, interestingly enough Microsoft removed it completely from the 2016 and 365 SDK’s. The same thing will no doubt happen concerning SOAP vs. Web API organization and discovery services the best thing developers can do is hit the learning curve sooner.
The tooling API’s basically sit on top of the core assemblies and provide the developer with more options to quickly get applications built that need to integrate with CRM in summary the new tooling assemblies provide:
Interface for CRM API’s
Common Login Control (replaces the ConnectionDialog Control)
Web Resource Utility
Automated deployment helpers
Microsoft’s Unified Service desk application for example was built using the new set of tooling API’s. That’s great if you are using 2013, 2015 or 2016 but from 2016 onwards (in an ideal world) you should be using the Web API and have re-factored any other code that was dependent on the Organisation Data Service end point (OData) and indeed code that was calling the Organization/Discovery SOAP end points. Existing CRM Online subscribers have a limited time before they will be moved onto the Dynamics 365 platform, so unless that is planned for it could end in disaster especially once the SOAP and OData endpoints are completely removed.
Dynamics 2011 Implementations
There are still many customers out there who are still on Dynamics 2011 and you never know from one CRM Project to the next what version you will be using so its still important to know what is the best approach. Most if not all CRM 2011 implementations will be using the Microsoft.Xrm.Client.dll and more specifically the Microsoft.Xrm.Client.Services namespace within it. Chances are that many will have created there own wrapper class to make the data layer easier to use along with connection caching to improve performance.
Something which is a little confusing at the start and easy to miss is the following:
using Microsoft.Xrm.Sdk.Client;
using Microsoft.Xrm.Client.Services;
These are not the same assemblies.
The first one is part of the main Microsoft.Xrm.Sdk.dll and contains useful classes for proxy connections by including the namespace it means we can define the proxy type as OrganizationService _proxy as opposed to:
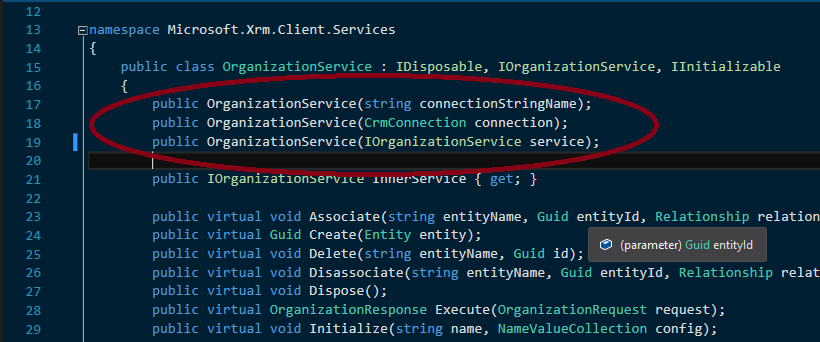
The other separate assembly Microsoft.Xrm.Client.dll and its .Services namespace is used most of the time, as it contains multiple constructors and classes to make connecting to CRM easier whether that’s for a console application or an Interface based application. For the latter, you may elect to use the ConnectDialog control found in:
The services class allows us to instantiate the Organization Service (connection) in a number of different ways:
Connection string passed via constructor
Using it’s internal CrmConnection class via constructor
Pass in a object that has implemented IOrganisation which is normally a proxy object (which itself implements IOrganizationService)
Helper Code
Finally, you could just use the CrmServiceHelpers.cs and DeviceIdManager.cs helper classes found in each of the SDK’s; which pretty much are just referencing the Microsoft.Xrm.Sdk.dll assembly but automatically provide the user with prompts so they can login to multiple CRM server targets and instances/organisations.
Therefore you don’t have to use the Microsoft.Xrm.Client.dll library you could just rely upon the standard assembly. Aimed mostly at 2011-2015 here are some very basic comparisons in code:
Using the Client Services assembly/namespace:
using Microsoft.Xrm.Client.Services;
using Microsoft.Xrm.Sdk;
using Microsoft.Xrm.Sdk.Client;

OrganizationService service;
ClientCredentials MyCredentials = new ClientCredentials();

// you would have to set the properties for MyCredentials first before instantiating your proxy
IOrganizationService _serviceProxy = new OrganizationServiceProxy(new Uri(strURL), null, MyCredentials, null);

service = new OrganizationService(_serviceProxy);
The approach we see in the SDK examples using the crmhelper classes:
using Microsoft.Xrm.Sdk;
using Microsoft.Xrm.Sdk.Client;
private OrganizationServiceProxy _serviceProxy;

ServerConnection serverConnect = new ServerConnection();
ServerConnection.Configuration config = serverConnect.GetServerConfiguration();

public void Run(ServerConnection.Configuration serverConfig, bool promptforDelete)
{
  try
   {
    using (_serviceProxy =
    ServerConnection.GetOrganizationProxy(serverConfig))
   }
_serviceProxy.EnableProxyTypes();
_service = (IOrganizationService)_serviceProxy;
}
Depending on the business requirements sometimes we can use the SDK helper classes directly to save a great deal of development time (especially for basic data tools). However most of the time we have classes that are specific to the business itself which requires a combination of the SDK, your custom wrapper class (e.g. myOrgCrmConnection/CRMIntegrator.cs) and the Microsoft.Xrm.Client.Services library.
Depending on the version of CRM you are working on you will most likely want to use the relevant SDK – why? Well as developers we need to move with the changes, Microsoft especially are great at deprecating assemblies and features. At times we get lucky in that we can use older SDK assemblies and point them at new versions of CRM (thereby not having to refactor helper code necessarily) but eventually this will stop working.
Try for example to run the CRM 2011 SDK Query sample against a Dynamics 365 organisation and you will quickly see what I am saying. In addition the .NET Target frameworks are different so it makes sense to use the appropriate SDK for the specific version of Dynamics which you are targeting as a general rule of thumb. Just to emphasize the point further you wouldn’t use .NET Framework 4.6 to target CRM 2011, one primary reason being it’s not compatible.
SDK assemblies being removed between releases can be a pain, for example the Microsoft.Xrm.Client.dll has been around for a while now and simplifies the connection process but was removed from the SDK in 2016. It’s not the end of the world but it does signal to developers whenever this occurs they probably should no longer be using those library going forward which is something the comparison diagram illustrates quite well. The new tooling API’s were first released in 2013 and those developers who picked up and adopted the change of direction quickly in the long run had the least headaches. That said it doesn’t help much when working on an existing/older CRM implementation as often you won’t be in a position to justify the additional effort and resource to move from one assembly to another one.
As mentioned from CRM 2013 onwards the SDK was updated with several assemblies all part of the new XRM Tooling API library:
The features of the new set of API’s introduced in 2013 is the subject for another article but they essentially take the SDK helper classes and connection dialog found in 2011 SDK along with the Microsot.XRM.Client.dll to the next level. These API’s basically sit on top of the core assemblies and provide the developer with more options to quickly get applications built that need to integrate with CRM in summary the new tooling assemblies provide:
Interface for CRM API’s
Common Login Control
Web Resource Utility
Microsoft’s Unified Service desk application for example was built using the new set of tooling API’s. Then we see after 2013 Microsoft made further changes and removed Microsoft.Xrm.Tooling.Ui.Resources.dll from the SDK assemblies. It is a frustrating thing when you have leveraged the libraries only to find they are soon likely to be deprecated and not work with newer versions of the platform.
Since CRM 2016… all of this has changed considerably with the introduction of the Web API and such many of the libraries mentioned here will soon become legacy at least in there current forms.
If you are relatively familiar with the developer toolkit and have it installed and working you might appreciate a more step by step guide on how to get a plugin setup. If not this post below goes into more detail around getting the toolkit installed and deploying your first plugin.
This screenshots shown in this guide are based on VS2012 and the last stable release of the developer toolkit with CRM 2013. At time of writing the toolkit works with 2016 Update 1 along with Dynamics 365. It is worth mentioning that you don’t need the developer toolkit to create a plugin however using the latter does save time especially when working on a real client project. If you need help on installing the developer toolkit and setting up your development environment I have wrote separate guides outlining how to do it.
For now we will assume you are new to plugins and are wanting to learn how to get this working using the CRM developer toolkit. By the end of this article you will have created a simple plugin and got more familiar with the supporting tools. If you already familiar with the developer toolkit you may want to skip ahead towards the end when we get into some actual plugin code.
From within Visual studio:
Go to new Project (you have a few options here for creating plugins)
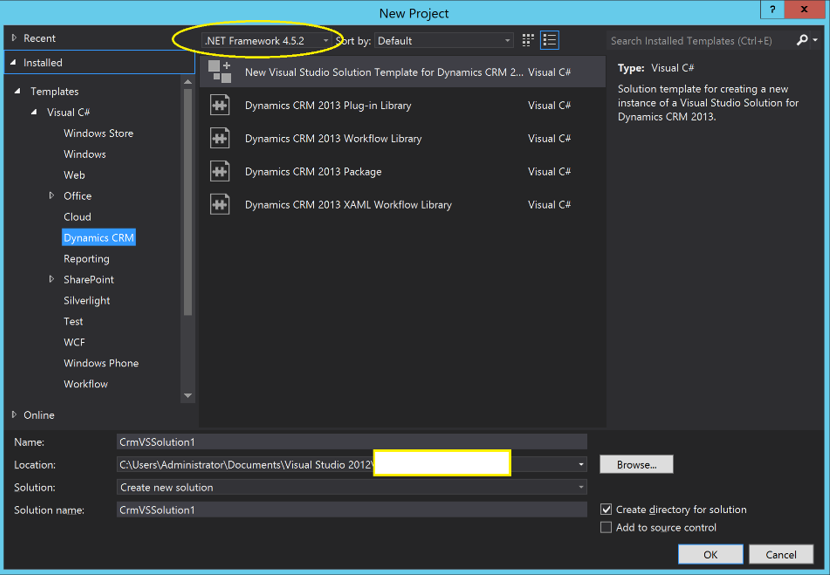
Use the Solution template for Dynamics CRM (See below)
Use the Dynamics CRM Plugin Library extension method
Create new CRM Package which will automatically add a Plugin class for you
Just create an empty C# class project that implements IPlugin
For the purposes of this guide just select the template. Before you click on the OK ensure you have set the target .NET framework.
Annoying bug: Even if you select the right target framework above, the actual target framework in the projects it creates does not match. This means you have to go and update each of the projects (Plugins/Workflows) to correct target version. One way round this is to do the above once update the references etc and then save this as your own custom VS template.
Pay attention to the bottom right “Create directory for solution”, ensure your paths are correct typically you want things structured as follows:
Your Solution Folder
Packages (contains stuff like ILMerge/NUGet libs)
Bin Folder (CRM SDK’s and 3rd party DLL’s)
Projects
Plugin
Workflow
Silverlight etc
Personally I like to remove the Silverlight project as that is a deprecated technology and not relevant to most CRM projects. Next thing which should happen if your developer toolkit is working properly is for Visual Studio to prompt you for the CRM Dynamics tenant and login credentials.
As it says under Connection Details, it wants the “discovery service API” details. Under the hood it will be using the SOAP end point https://disco.crm4.dynamics.com/XRMServices/2011/Discovery.svc and the Organisation SOAP end point once you have selected the Organisation and solution name.
The important thing of course is the username and password, as that tells the toolkit what our target tenant is which itself may have multiple instances (organisations) each having their own specific solutions this is why the toolkit uses the discovery API for the CRM Explorer panel/deployment. Now click Ok then it will go and create a CRM solution for you consisting of:
CRM Package project (contains final assemblies for CRM deployment/Web resources)
Plugin project C# class library
Workflow project C# class library
Silverlight project (you can delete this as abandoned by MS, 2014 due to HTML5)
However we are not yet ready for development or deployment:
Framework version for the projects are likely to be incorrect
Framework warnings due to VS Toolkit being built in 4.5 not targetted at 4.5.2
The namespaces and assembly names in your solution wont be fit for purpose
No project exists yet to contain your early bound classes
No ILMerge (Online CRM needs it to reference non CRM/MS system DLL’s in Plugins)
The plugin and workflow projects have to be strongly signed before deployment
The CRM references are likely to be pointing at a location outside of the solution (not ideal) what we want to is copy those locally within the solution Bin folder
Depending on your experience the above may be self explanatory and easy for you to get up and running so you can skip the next part. However, the rest of this guide will assume this is not the case and will give you step by step help to address the stuff listed above.
The important thing if you are new to this is to just break things down into layers and focus on one project area at a time, rather than trying to get the whole thing building and working straight away.
CRM Explorer Pane
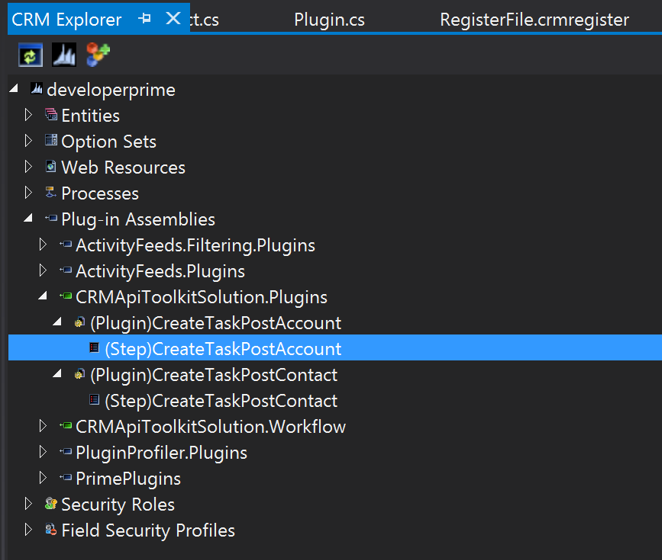
Once you create a CRM Solution via the developer toolkit extension, you will see a CRM explorer pane allowing you to browse components that “exist in your CRM Solution”, if you close this pane or need to get to it in future simply go to Tools Menu->Connect to Dynamics CRM Server or View->CRM Explorer.
However: If this is a new project I recommend you try to connect first as without that you will have no connection to CRM for deployment. I have blogged how to get the CRM Explorer/Connection window back.
The CRM explorer pane is loaded every time you open the Solution in VS and is needed so you can control the target CRM instance for the intended deployment.
You can remove the silverlight application project. Also note as of 2014, Silverlight is no longer recommended for Dynamics CRM as Microsoft dropped it in favour of HTML 5.
Create a folder called Bin within the route of your solution. Now copy the CRM SDK DLL’s from its Bin folder into that folder. Update all references in the CRM Solution to point at this location. The only exception is if you have SvcUtil sourcecode added and its not latest version as that needs to use the DLL versions as shipped. Ensure copy local is false for the System and Microsoft CRM references.
Update ALL references in the solution and its child projects to point at the same DLL’s in that Bin folder, this will help reduce build errors, keep things packaged together for TFS deployment and help to minimise reference issues especially where multiple developers are downloading and checking in the code to a central repository.
Sign the Plugin and Workflow projects (required before you can deploy to CRM), no password is required in the signin. Use defaults and create separate key files (normally with same name) in both Plugin and workflow projects. If you have Display Adaptor issues just hit CTRL+S to save changes.
Create a folder called “Base Class” within the Plugin project and drag the auto generated Plugin.cs into this location. We don’t edit this file directly, unless wishing to inherit useful global methods in our project. The plugin.cs base class implements IPlugin.
More on Plugin.cs
If you right click on an entity in CRM explorer and create the plugin step that way, it will dynamically, create for you a new class with everything you require from the base class plus update the RegisterFile.crmregister file for you whenever you change the plugin step or namespace within VS.
The default Plugins.cs file created for you automatically should be treated as a base class and then you inherit from it acccordingly this is useful as we can create our standard methods if needed in the base class for enscapsulation which will get inherited by any new plugin clases. Ensure too that the namespace in the file is what you would want to use a default for all of your plugins it should match.
Go to CRM Explorer, right click the entity you want to create a plugin on to automatically generate the class file and empty GUID’s behind the scenes in RegisterFile.crmregister. It will not only create the class for you (based on what you entered in the class name) but also automatically inherit from the base class and change from the default IPlugin to Plugin (the latter being your base class).
The developer toolkit extension uses the base class to “dynamically” create your new plugin class, therefore it wont be identical. Interestingly note that when it creates your class Execute method it takes a parameter of LocalPluginContext (don’t confuse this with the normal standard IServiceProvider parameter that you typically see in Plugins) instead we instantiate our class.
As part of that instantiation it automatically calls the default base constructor which sets up service provider, factory, organisation service for us. If you need to do REST/Execute operations you can easily access them via that class instance, cast them to local new instances or define them locally. However, you should always do operations within the Plugin context itself to ensure you don’t have issues when the same plugin code is being fired under a different worker process, or when you have multiple synchronous threads that are being executed at the same time. The latter can lead to concurrency/data inconsistency issues if you step outside of the context
Understanding the RegisterFile.crmregister file
The file is stored within the CRM Package project and is updated locally by the developer toolkit whenever you use the CRM explorer to create or change Plugins. It contains the plugin step and configuration information along with any custom workflow activities that you may have defined. As well as the assembly information for the Plugin(s) and workflows it defines the IsolationMode, the UID for the step, along with any other custom configuration you may have specified.
Before your first deployment to CRM this file will contain empty GUID’s (36 bytes in length) covering the DLL assemblies to be built within your solution. Then whenever you change the plugins, if you do so via the CRM Explorer and deploy this way, it will automatically publish the configuration within CRM and then retrieve from CRM the specific ID’s and other information.
Though not ideal however sometimes you can (and must) modify this file directly after performing some action in CRM explorer, a good example is that VS Toolkit does not support all of the “message types” you would otherwise see if using the plugin registration tool (e.g. The associate / disassociate messages) which don’t have a primary entity (it is system wide). In this scenario you would create this based on say account then manually edit the file to specify isolation mode, message name etc. In any case you need to tweak the isolation mode for Workflow assembly if you are deploying to an Online (Sandbox) instance.
Right click on CrmPackage and rename to give it a meaning full name (e..g Client Project Name) do the same for the Plugin project and Workflow project ClientName Plugin etc.
In the property window for the plugin projetc ensure the Assembly Namespaces are set properly e.g. Assembly Name=.Plugins and class default namespace = .CRM.Plugins. Ensure target framework is right for the target version of CRM Dynamics. Ensure plugin base class has identical namespace as that used in new plugin classes created via the toolkit otherwise you will get missing assembly errors and unnecessary separate namespace in the packaged DLL between the base class and your classes.
Tip: By renaming the project files this will automatically cause RegisterFile.crmregister file to be updated with the new assembly namespaces so we don’t have to manually edit the file.
If you haven’t already now you can remove /delete the default sliverlight application project.
Now try to Build the Solution.
You are likely to get following error when trying to build the solution.
CRMApiToolkitSolution.Plugins.dll” could not be resolved because it was built against the “.NETFramework,Version=v4.5.2” framework. This is a higher version than the currently targeted framework “.NETFramework,Version=v4.5”.
This is because the target framework for VS Toolkit extension was built using v4.5 not 4.5.2. To fix we have to right click on the CRM package project, unload it, then manually edit the csproj file line
v4.5
Update it to:
v4.5.2
Save and Reload the Project, the warning will disappear. If you ever modify a project file directly I recommended restarting VS as sometimes it can throw off the MSBuild process leading to obscure errors.
At the moment VS toolkit was last released with CRM2013 and still works with 2016. It is believed that MS though they discontinued support will be updating this for 2016 and VS 2015 onwards. Once you know it’s stable it best to move onto 2015 and latest versions of the toolkit.
Before we deploy create an empty class on account entity via CRM explorer as follows:
The values you select and enter in here will be part of the RegisterFile.crmregister fileused to register the events/steps within your CRM solution. Check if RegisterFile.crmregister has been updated and that the isolation modes are as you would expect for the target CRM instance. At this point there will be no ID’s within the file as we are yet to deploy to CRM.
If you missed the step earlier, update the new plugin namespace to match the base class accordingly if there is any mismatch. Now Build the Plugin project, then build the entire solution, check all is well with the compilation before trying to deploy.
Deploying to CRM
Right click on the CRM Solution and select “deploy to CRM”. This will then instruct Visual Studio to make a connection to your CRM instance based on the settings within the CRM Explorer and deploy the JavaScript, Web Resources (e.g. JS, PNG, HTML files), Plugin and workflow assemblies to CRM. There is a separate article on this but if you are referencing/ using any non-microsoft CRM assemblies and deploying to CRM Online (Sandbox) you will encounter errors from within CRM see the two-part series on early binding for more details on what you need to watch out for in this scenario.
Once the deployment has successfully completed you can check if RegisterFile.crmregister has been updated. If you get a prompt as follows it’s a good sign that everything has connected and been applied as expected:
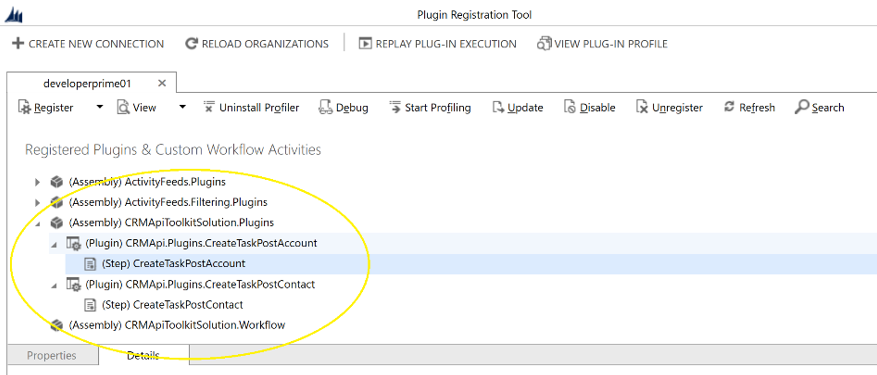
We can see from below that the VS extension has retrieved and populated the assembly and step GUID’s following the registration within CRM.
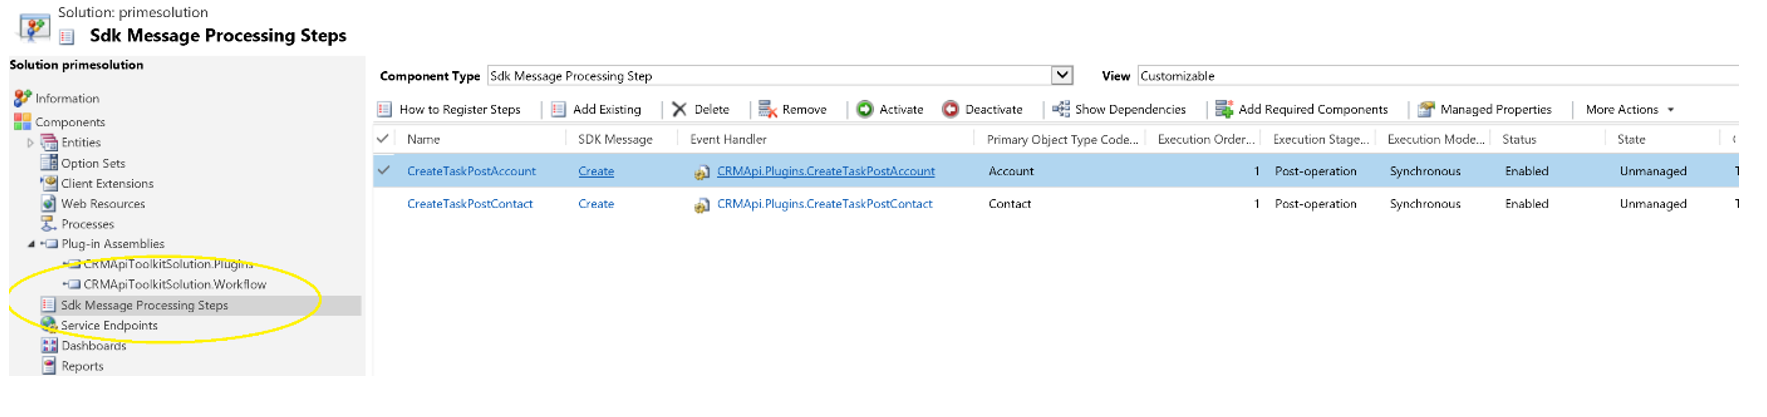
Just to ensure without doubt that everything is connected up right I would recommend you go into CRM and within the solution you deployed to manually check the ID’s and all settings are as you would expect.
You could also go into the default solution and check here as ultimately that is where assemblies reside on the server. Public key token is generated via the signed DLL key and deploy action. Finally, if looking for exact details on how this was registered the number one tool to use is Profile Registration.
Adding more Plugin steps or changing steps
You can do this from CRM Explorer, navigate the CRM Assemblies area, expand the Plugin Assembly and then right click “new step”. Doing it this way especially if you want a plugin to handle multiple messages that fire on entities will ensure that VS is the master.
Now every time you or another developer deploys to CRM it will mirror the VS configuration which always overwrites the data within CRM (even changes that were done using the plugin registration tool for example) or someone builds the DLL in a separate project and manually updates via the profile registration tool.
If the plugins rely on specific “GUIDS” hard-coded it ensures that when you deploy to dev, uat, production instances that by editing the RegisterFile.crmref file directly prior to deployment that everything will work as expected. Hard-coding GUID’s should be avoided where possible but there are some exceptions where this may be the only way to implement the solution due to CRM Dynamics major reliance on GUIDs.
In CRM after VS deployment
Creating early bound classes
It is probably at this stage you will want to think about creating early bound classes. Some people argue that late binding is faster and less of a bloat to CRM. I’m not going to get drawn into the debate between the two approaches other than to say I prefer to be type safe and have better code portability/readability than get caught up over a difference measured in the milliseconds. It all depends on what you are doing in the solution. Read my article here if you need to know how to create early bound classes.
Coding a simple Plugin
Appreciate the above is quite a lot of information to digest!! However it is best to be comprehensive on this because everyone is at a different level of experience.
It may not always be necessary to set this all up every-time you develop a plugin but it’s worth starting here so you have a full picture on how you would typically structure a VS solution for CRM development.
Now you have this full CRM solution setup in VS you can have multiple project types and explore the different server and client facing API’s available to you under the SDK all from one solution (I think that’s nice!).
Here is some code, for a simple plugin, it will following the creation of an Account record, create for us a basic task record in CRM that is associated to the account.
This simple plugin uses both Late Binding and Early Binding techniques. It should be registered as follows:
Post Operation
Synchronous
Create Message
Primary Entity: Account
Ok, first thing .. I have deliberately coded the above in such a way that is showcases different key areas of a plugin (it is not the standard way you would typically code it) but for the purposes of helping you to understand the Plugin Anatomy presenting it in this way should help you to understand what is happening at a lower level.
Before we get into the nuances of what this code is actually doing and what the various lines mean lets start at a higher level. There are a few common concepts you need to be aware of when creating plugins or indeed accessing the SOAP endpoint which is something you do whenever you create a Plugin/Custom workflow activity or develop an external application that connects to a CRM organisation.
The CRM SDK’s make life a little easier for you in that it encapsulates the SOAP envelopes and transport levels so you simply call methods most of the time and don’t necessarily need to be concerned with what is happening on the network transport layer. There are a number of “proxy” sevices that can be used across the various interfaces to make coding easier.
ServiceProvider
This in an interface provided by the CRM SDK. The service provider is the means by which we can instantiate the other services. It is normally the default parameter when creating plugins However, understand that if you create the plugin step via Developer Toolkit the localcontext parameter it is showing in the Execute method is actually a separate base class implementation that gives us easier access to to services without having to mess around creating local context, factory and service objects instead we can access that from the localContext object.
Context
The source which has caused the plugin to execute, from here you can access input parameters such as the name and type of the context. You can also check things like the Message name to ensure that the code is only executing if invoked by the expected message.
Service Factory
We use this to instantiate our organisation service. If getting a service you typically pass in the userId that was part of the context. The Id passed in will depend on how you registered the Plugin, so if you specified “calling user” it will be the user which triggered the event; otherwise the specific user GUID you selected in the pick list.
Service
The desired web service either organisation or discovery. Under the bonnet this will be using the SOAP API. The Web API is for custom web resources only running within the application. This is true to both Plugin/Workflow execution and external applications created that connect to CRM instances. Service is used for Accessing Data and MetaData from the CRM platform.
Message Pipelines
Keeping it simple we have 3 types:
Pre-Validation
Changes made here are applied before any database transaction. It is said to execute outside of the CRM transaction.
Pre-Operation
Changes here are done within the transaction before changes are committed.
Post-Operation
Code that runs in here is “after” the event, so in our example, code in here would be expected to execute following the Creation of an Account with the details about that Account being available to us to then do some subsequent post action (like Creating a Task) and setting what it is regarding.
Creates a “late bound” entity object based on the context target, which we are expecting here to be “Account”. You can however see in the code I haven’t used late binding and instead used an explicit class type.
Early Binding Example
Task followup = new Task();
Creates an “Early bound” task type object. This means we can access the attributes, using intelli-sense that are known to exist on that entity. This means we are “type safe” and don’t have to second guess what reference or primitive types are required at any given time. In more complex coding scenario’s having access to that early information on the objects we are working on is crucial to avoid errors and to improve productivity during development.
Calling the Organisation Service
_service.Create(followup);
We are using the CRUD operation known as Create and passing in the early bound type. This will then go and create for us a Task record in CRM that is correctly set to regarding the target account. Underneath the SDK libraries are building SOAP envelopes and Executing them on the server. The ToEntity conversion is massively important without it the code will not work in Sandbox mode when using early bound classes that are within a different assembly that has been merged unless you have taken key steps to ensure that proxy types are included in the merge process explained here.
This article will outline how to setup ILMerge so that when you compile the various projects within Visual Studio the output assemblies can be merged into a single assembly as required when registering those as Plugins/Custom Workflow libraries to be used with Microsoft Dynamics CRM Online or On Premise where the isolation mode is set to Sandbox.
How to use ILMerge
There are two ways of doing this:
As part of the MS Build process
Manually through the command line
The following instructions are based on Visual Studio 2012/.NET 4.5.2 it should more or less be the same for the latest versions of Visual Studio.
Using ILMerge as part of the build process
This is a little tricky to setup at first but once done means that whenever you build your projects as part of the CRM solution everything will be built (merged) for you without you then having to do additional steps manually.
The first thing you need to do is right click on your plugin and workflow projects and go to Manage NuGet Packages. In the top right search for ILMerge. Then install the ILMerge and MSBuild ILMerge Task. The packages will be downloaded and will create a folder called packages within your solution folder. Download ILMerge Task first and allow it to download the latest ILMerge.
You can then verify everything looks as expected by go to Tools->Library Package Manager->Package Visualiser:
Now we need to ensure that ILMerge command is part of the build process to do this we must manually edit the Plugin cs file. Unfortunately the package installer adds files to our solution but does not go all the way in configuring this for us. You will note the following files are shown in your project now:
ILMerge.props
Packages.config
ILMergeOrder.txt
Right-click on your plugin project and near the bottom of the menu context window you will see an option “unload project”. This enables you to edit the project file within VS simply by right clicking and selecting edit.
Set the paths and make sure the settings within packages config file matches. You need to ensure paths match your VS solution file structure and that the versions of ILMerge Task match those from the installed NuGet versions.
This project references NuGet package(s) that are missing on this computer. Enable NuGet Package Restore to download them. For more information, see http://go.microsoft.com/fwlink/?LinkID=322105. The missing file is {0}.
<!– To modify your build process, add your task inside one of the targets below and uncomment it. Other similar extension points exist, see Microsoft.Common.targets.
After this you then right-click on the project to “reload the plugin project”. This completes editing the Microsoft build steps for your specific CRM solution project however we need to also update the targets.
Assembly Type Information
When I first tried to use ILMerge I forgot to do this step and you guessed it things didn’t work as I had expected. Looking back now it seems an obvious mistake and it probably was but there are so many things to consider when building a project for CRM deployment it’s easy even for the most experienced to forget key steps.
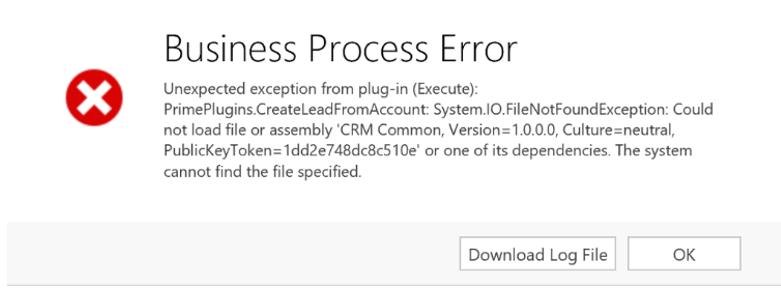
Sufficed to say this is major step for the assemblies to work as you would expect. If you don’t do it then serialisation errors will be triggered; there are work around’s such as defining implicitly the types and converting them at compile time. The type of error from CRM which I am talking about would look as follows:
System.Runtime.Serialization.SerializationException: Microsoft Dynamics CRM has experienced an error. -2147220970
Which according to Microsoft basically translates to “An unexpected error occurred”. If you debug, you are likely to get misleading errors such as “incoming entity id Does Not Exist”.
Go into your Workflow Activity or Plugin folder and expand the “Properties” node to reveal the file “AssemblyInfo.cs”.
Then at the very bottom of that section you need to add the following line:
This will ensure that SDK Class Types are packaged up as part of the DLL, this is important so that when it’s merged, the CRM application is able to Cast between your early bound types and the types expected within the proxy. For example _service.Create(Entity TaskObj), the Create method expects an “Entity” class type not an early bound Task type.
If you don’t have this line all plugins and custom workflow activity projects registered in Sandbox isolation mode will not work and throw a serialization error. One possible work around is to change the code to say _service.Create(myEarlyBoundObject.ToEntity()) that would work however is not exactly very readable and is something of a hack. To avoid the problem add the line above to the AssemblyInfo.cs files wherever those projects need to reference your early bound library.
Editing Your Packages.config
This is important as its a clear sign you have ILMerge in the right VS Project simply by it being present. More importantly the information contained within the file is a good checksum when comparing package files actually on your machine and there relative paths to the project (all have to be correct for ILMerge to work). Also the target framework has to be set correctly.
Signing Assemblies for CRM
The Plugin DLL needs to be signed with or without a password. In addition your custom library will need to be signed for this to work as expected in CRM. In this example I created two separate key files with the same name “signingkey.snk” one in the early binding class project and one for the actual final plugin assembly. However surprisingly the 3rd party library newtonsoft (JSON.Net) was successfully merged I assume it may have been signed by author or this could be a red herring when it comes to 3rd party DLL requirements.
System.IO.FileNotFoundException : Unable to find ILMerge Executable
This is the error I was receiving when trying to build my plugin project that was referencing the early bound Common CRM class DLL. I discovered that probably due to “re-distribution” legal reasons that although the packages had been downloaded the target folder “packages\ilmerge.2.14.1208” did indeed not contain ILMerge.exe. Instead go into the packages\ilmerge.2.14.1208\tools sub-directory and copy it from there into the folder “ilmerge.2.14.1208”.
The build then worked successfully.
Specifying Assemblies for Merge
Within a Visual Studio solution you can have potentially many projects each with their own references. The question then arises how do I specify what assemblies to merge? It is important you have set the order in which projects are built within Visual Studio using the “Project Build Order” menu option when you right click on the solution/project. Next you need to pay special attention to the “properties” window of each of the assemblies you have referenced within the project. The property “Copy Local” should be set to “True” for all the assemblies you wish to get merged. As an example: Lets say you have an early bound project called Common, you would within your Plugin/Workflow project have created a reference to it by browsing to the DLL debug folder location, after you have done this you would specify within the plugin project that the Common assembly should Copy Local. This informs the ILMerge during build to Merge it.
That is not the end of the story, even if you have done the above the Common library will not be merged unless you have also in addition instantiated an instance of a class from the Common library within your Plugin code (in other words you have code that use the classes and methods defined in the referenced Common assembly).
If using the standard developer toolkit you normally end up with two output assemblies yourplugin.dll and yourworkflow.dll and those each contain merged DLL’s such as Common.dll for early binding and any other referenced DLLs that you may have merged.
Remember adding the code direct to the DLL is the preferred and recommended approach to avoid CRM Plugin errors so always go back to basics if things don’t work as expected it may be down to the merging process.
All assemblies with Copy to Local set to true will be merged. Conversely, you normally ensure that all CRM SDK and Microsoft Core assemblies have the set “Local Copy” to false.
How to check everything was merged
Within a Visual Studio you will notice that when you build your solution that the Output window contains the steps MSBuild has taken to merge the relevant assemblies. There will be a line which says “Merged Assemblies: yourdll.; next DLL; next DLL; etc”. You can also use an assembly de-compiler tool such as the excellent Jet Brains Dot Peek. It is a very easy to use tool which basically allows you to see what classes are part of an assembly and see the source code within the assemblies. Therefore in our earlier examples, within the Plugin.DLL file we’d expect to see the early bound classes within it and any other classes from 3rd party assemblies we may have merged such as newtonsoft.dll.
Testing it all works
The first time you go through this it will be painful but at least you have this guide to help you which is more than what I had at the time. My advice is to do each step slowly, go the extra mile by using something like Dot Peek to interrogate the contents of the DLL and ensure it works outside of CRM; before then deploying to CRM and expecting it to all work first time! (That is unlikely) so just be realistic here and work through each stage logically ensuring you understand why each step is required for this to work. Also remember that officially Microsoft no longer support this tool and approach because it can lead to unpredictable behavior as discussed in Part 1.
Best of luck! That completes this two part article on: how to register an early bound library within Microsoft Dynamics CRM Online Sandbox Isolation Mode. Any questions or comments as always feel free to contribute.
That’s quite a mouthful, spent at least 3 minutes just trying to figure out an appropriate title for this article. This article does not just relate to early bound assemblies but also any other assembly that is not part of the Microsoft core global assembly cache or the custom Plugin assembly itself.
Let’s say you have a plugin or a custom workflow activity that needs to some fancy stuff and you wish to leverage an existing dynamic link library (DLL) from a 3rd party. Well you are out of luck if you are using Microsoft Dynamics CRM online (well almost!), drum roll please……..
I’m not going into the pros and cons of late binding vs. early binding that perhaps is a subject for another article however know that Microsoft’s official standing on this is to use Early Bound whenever this is possible to do so: Microsoft Dynamics CRM Best Practices
For now I am going to assume you are like me a sensible soul who values things like improved code readability, portability, reducing the chances of errors and being able to access CRM types properties, methods, and events at Compile time. If that’s the case this article will be very useful to you.
Oh no not that error again! or perhaps you received something similar to the following error message:
“System.Runtime.Serialization.SerializationException: Microsoft Dynamics CRM has experienced an error. -2147220970 “
What is going on?
Plugins and custom activity workflows that execute within Microsoft Dynamics CRM online always run in Sandbox isolation mode. This is to limit potential security vulnerabilities and reduce the chances of code doing something it really should not be doing on a operating system level.
If using an On Premise version of Dynamics CRM you have two options when registering a plugins isolation mode namely “sandbox” and “none”. If the latter the plugin is able to access other assemblies, resources and code outside of the security context of the CRM application (IIS). In addition other things such as accessing files directly on the file system or perhaps reading and writing to the Windows Registry.
Imagine a scenario, where you want all of the relevant entities and custom entities you have created within a Dynamics CRM solution available to you from multiple project types within Visual Studio, it could be for example:
Plugin Project
Workflow Project
Data Integration Project
Early Bound Common Project
Wouldn’t it be nice to be able to easily access the latest, one common early bound library from all those projects? I think so. The problem is the isolation mode, when you register your plugin assembly it will not include the Early Bound DLL, neither will the Custom Workflow activity assembly which means when the CRM application tries to access the early bound types it isn’t going to have a clue about what those things are and where to find them.
Great, so what are our options?
Well there are several and this is something I ranted on about in the Dynamics Community website (Error in Sandbox Plugin). Fortunately, I was able to get support and insights from Scott Durrow (if you don’t know he is the person who developed the excellent Ribbon Workbench Tool) and is well known by Microsoft, IBM and the Dynamics Community.
The general accepted view is “to not generate a separate assembly” but instead link to the project from within Visual Studio this means that the code will be included within each assembly you generate. That sounds OK … but… what if I don’t have the code? what if I have a number of 3rd party libraries that I wish to use rather than re-inventing the wheel?
It doesn’t meet those scenarios and the truth is I am just way too stubborn to accept something which to me doesn’t instinctively feel right. I like the idea of having all the early bound stuff encapsulated within it’s own library that can be then referenced from any type of application.
Our Answer: ILMerge
It’s name is as Ugly as it is to get up and running in the first place! ILMerge is a utility developed by Microsoft Research that allows multiple DLLs to be merged together into a single DLL Library.
Before we get into this epic drama it is worth mentioning that Microsoft do not officially recommend this approach as it has been shown to sometimes cause issues with Plugin assemblies and types not casting as expected leading to serialisation and plugin execution exceptions at run-time. The general consensus from the community would seem to be:
For Online and this Scenario:
Avoid ILMerge if possible and instead look for open source alternatives and include the code in your Plugin and Custom workflow activity projects
Add the early bound code class files to each and every CRM project and Solution. To make this easier use Add-Link from within Visual Studio (you reference the external file via a Link)
Of course for On Premise you have more options and can reference other libraries so long as the plugin is set to execute in the “None” isolation mode:
Register the assembly on disk with any referenced assemblies in the same directory.
Register the referenced assembly in the Global Assembly Cache (GAC)
If you were not to use ILMerge, you can achieve something similar to referencing a DLL (meaning you still have one master common library) doing it via a link instead. Linked project items in Solution Explorer, can be identified by the link indicator in its icon (a small arrow in the lower left corner).
By linking to a file, you can capture ongoing changes to a source file without having to manually update a copy whenever changes are made. However, if the underlying file is deleted, the link will be broken.
In Solution Explorer, select the target plugin/workflow project
On the Project menu, select Add Existing Item
In the Add Existing Item dialog box, locate and select your Common Project early bound class items item you want to link
From the Open button drop-down list, select Add As Link
Should I even bother to use ILMerge?
For simplistic plugins that are just referencing an early bound library and not lots of other third party DLL’s it is unlikely you will have issues with ILMerge. Even so the problem still exists of what to do when using Microsoft Dynamics CRM Online where your plugins/workflows need to leverage third party libraries and the Isolation mode is Sandbox as opposed to None. In that scenario this is not possible unless you Merge the assemblies and to see how to set that up I welcome you to read Part 2
It’s easy right? you just simply go into the solution within CRM, drag and drop navigation elements set the target entity and it’s all done in a jiffy – unfortunately no! Microsoft can you please have a think about how you could make this easier given it is part of the platform configuration?
This article is going to assume that you don’t really get any kind of buzz from manually editing the Sitemap.XML file or any XML file for that matter and would rather use an interface to get the job done; otherwise if that’s not you then read the following to your hearts content and best of luck! Editing Dynamics CRM Sitemap.
“Doing this manually requires exporting an unmanaged solution, unzipping and editing the files directly before then uploading back to server and importing. This is prone to error and will be more time consuming.”
For all us other people that like to keep things simple we can use XRMToolbox (if you haven’t heard of it read my other article – How to setup a Dynamics CRM Development Environment ) to get the job done nice and quickly I mean it really shouldn’t be that difficult right? So without further a do let’s get on with it.
The Dynamics CRM Sitemap
Ok I will try to move quickly on the history lesson but depending on what version of Dynamics CRM you are working on at the moment the sitemap has evolved with each and every version, originally in CRM Dynamics 2011 we had “vertical”navigation it was truly beautiful (!?!) it looks like this:
Then Microsoft recognised that the Dynamics CRM interface was actually quite uninspring and ugly, it needed a major face lift, fast forward and this is what we have now within CRM Dynamics 2016. In my view the interface is about 100,000,000 miles ahead of Salesforce CRM (SFDC – which seems to be stuck in the early 90’s!).
As you can the navigation is now horizontal at the top of the application where in my view you would expect it to be in the first place (err Website sitemaps tend to be here! not always but mostly…). We access the sitemap via the Hamburger Icon (an internal Microsoft development team expression – don’t ask) which causes the main modules to be displayed to the user, by default:
Sales
Service
Marketing
Along with Settings and Help Center (previously called Resource Center), so in total you have five high level Areas that all fall under the one root node which is the Sitemap itself.
When would it be appropriate to customise the Sitemap?
Glad you asked when you are working with clients not all of them wish to use all of the core features that the platform offers. Public Sector organisations for example, are for more likely to be interested in Service than they are about Sales pipelines, opportunities, leads and such like (though times are changing in the UK Government!). A retail organisation on the other hand will focus on both Sales and Service, plus in most cases Marketing. By customising the sitemap we are able to make the interface much more intuitive and specific to the users of the client organisation. Not only does this improve productivity it will also go a long way to simplify the user training sessions and prevent users from accidentally doing stuff that isn’t helpful.I think projects would run far more smoothly if we could just take away People (joking – but seriously KISS).
Using XRMToolbox to Edit CRM Dynamics Sitemaps
The Sitemap plugin within XRMToolbox, is not “solution aware” neither is that required as sitemap customisation always edits the master underlying system sitemap extension.
Although, solutions can have the sitemap extension included within them they are all in effect referencing the same default sitemap on that instance. Therefore “the order” in which you install 3rd party managed solutions is likely to impact on the sitemap and command button layout too if those solutions have included the Sitemap or Application Ribbon components (under Client extensions) within them.This isn’t just true for sitemaps it is pretty much the standard in terms of how solutions are layered upon each other. A common misconception is that a Dynamics CRM Managed Solution can be “gracefully” uninstalled well don’t fall for that Microsoft sales/ISV nonsense!!, in reality, even managed solutions are directly updating the default (system) solution this means that even if a managed solution is uninstalled there will still be fragments of meta-data left behind which does and can cause problems between solution updates! Apologies I digress this is a subject for another article but just be mindful of it.
Here is the little Gem we need!
When you open it up for the first time it will look like the following, note you need to first connect to your target CRM Instance then click the Load SiteMap button.
So we can see that out of the box (OOB) Microsoft Dynamics CRM 2016 Update 1 has five main areas.We can modify the existing Area’s and create new Custom Areas as required, you would create a custom area if you had a number of custom entities all providing extended functionality that are best grouped together; alternatively depending on the nature of the application you may instead to include those entities as part of a Group within the existing OOB areas. In the end, it all comes down to ensuring the UX makes sense for how CRM is being utilised by your client or employer.
So what is an Area?
An area is what you see along the vertical navigation, each one will then have one or many “Groups”, think of Groups as being the vertical lists of entities that each in turn have a header whenever you click on the area (tile icon). In turn each group then has sub areas and these are the actual links which could be an entity or a view. A good example is the settings node, which has five groups and then within each group, the sub areas which are the actual links
Example: Editing the Account item under the customer service area/group
The above diagram hopefully illustrates the correlation between links shown in the CRM application and where those settings are located within the XRMToolbox Sitemap editor.
Publishing Changes
Normally it isn’t needed to do a “Publish All Customisations “to see changes, a forced refresh of the default home page normally will cause the sitemap to refresh in the browser (you may have to do a couple of refreshes first).
Adding New AreasItems
If you right click on each of the nodes within the Tree:
SiteMap
Area
Group
The context menu will have a very useful option labelled “Add default X” this is a major time saver! So check that out and the same approach is used for adding custom entities.
Most of the time we are just want to use the standard OOB entities and move things around to better suit the client that is using CRM.
Custom Entities on the Sitemap
When you create a new custom entity it will be added to the sitemap under an “Extensions” group which isn’t normally what we want. Very often, custom entities need to be promoted (moved) to specific Area’s and/or groups as part of the main navigation.
Remember however that even if the sitemap has been correctly customised to show “entity x”, it will not be shown unless the user also has a security role that enables them to see it. Therefore, we start off with a standard “sitemap” but in reality, it will look very different across users depending on their security role(s) within the system.
High Level Steps
Typically the process is as follows:
Load XRMToolBox
Setup and/or connect to target CRM instance
Load SiteMap Editor plugin
Click LoadSiteMap
Right click on sitemap node and decide whether to add a default or create new area
Click Save (top right) under Properties pane
Click Update Sitemap
In CRM go to main page and force refresh (may take couple of attempts for cache to reload)
Other Considerations
Ensure consistent naming convention with area, group and sub area ID’s
You will most likely want to create transparent web resources (GIF’s) for Areas and if you haven’t already the custom entities
To not confuse user experience try to avoid changing out of the box icons/behaviours
Decide whether to add Privilege to sub-area to help control visibility or leave to system
If you have requirement for different languages the tool may be restrictive